Skip to content

How to Use DNA Ladders for Gel Electrophoresis?

The use of DNA ladders in gel electrophoresis has become crucial in molecular biology. These standards help researchers determine the size of DNA fragments. According to a report by the Bioinformatics Association, 75% of molecular labs rely on DNA ladders for accurate results. "DNA ladders are essential tools for visualizing and estimating DNA sizes," notes Dr. Jane Smith, a leading expert in genetic analysis.

In many applications, the choice of DNA ladder can significantly impact analysis outcomes. Different ladders offer varied fragment sizes and concentrations. It's essential to select the right ladder for the specific gel type used. While popular ladders exist, their limitations must also be considered. For instance, some ladders may not cover the full range of expected fragment sizes.

Understanding DNA ladders is not just about using them; it also involves critical evaluation of results. Researchers frequently question the accuracy of their measurements. This self-reflection is necessary for scientific integrity. Ultimately, successful gel electrophoresis relies on a deep understanding of how to best utilize DNA ladders.

How to Use DNA Ladders for Gel Electrophoresis?

Understanding DNA Ladders: Definition and Purpose in Electrophoresis

How to Use DNA Ladders for Gel Electrophoresis?

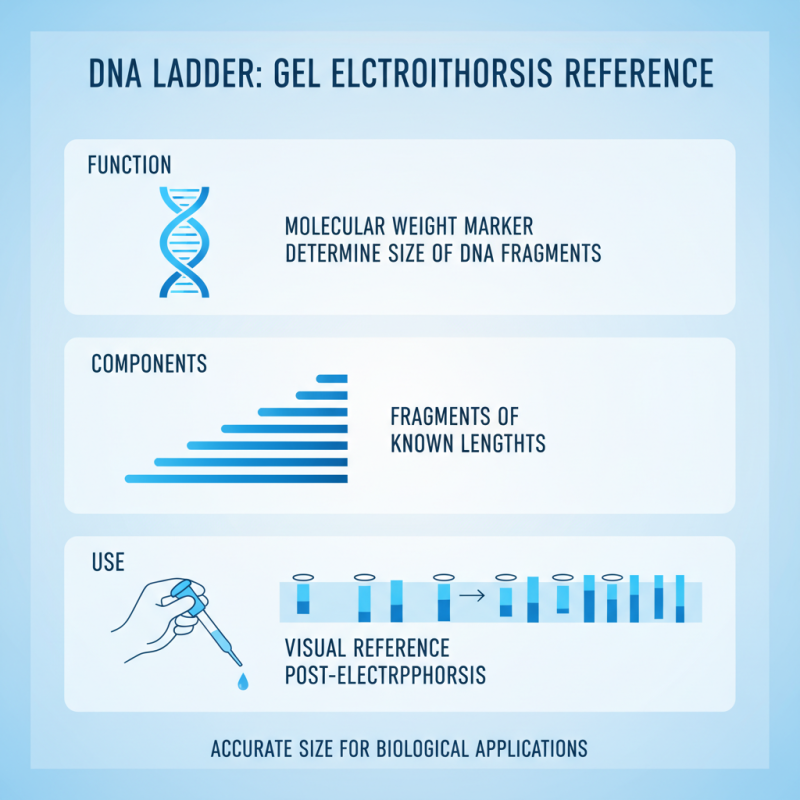
DNA ladders are essential in gel electrophoresis. They serve as molecular weight markers to determine the size of DNA fragments in a sample. A typical DNA ladder includes fragments of known lengths, acting as a reference. Researchers use them to assess the results after electrophoresis. Accurate size determination is crucial for many biological applications.

In a study by the International Society for Analytical and Bioanalytical Chemistry, it was indicated that the precision of DNA fragment sizing can significantly enhance experimental outcomes. Using accurate ladders can reduce errors in size estimates by up to 30%. This precision ensures reliable identification of DNA sequences and products.
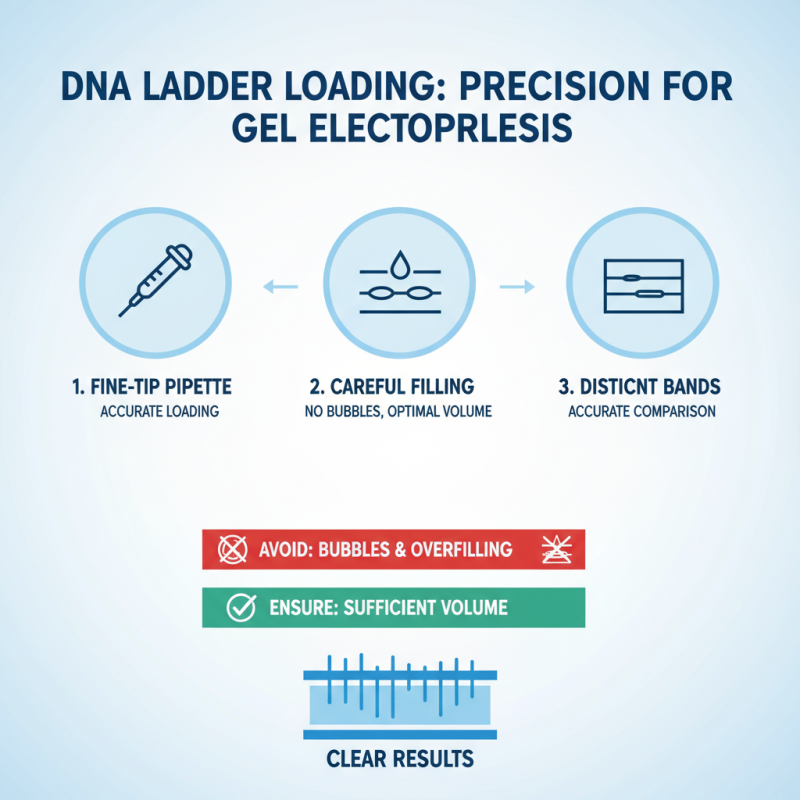
**Tips:**
Always select a ladder that matches your fragment sizes. This choice minimizes discrepancies. Additionally, make sure to run the ladder alongside your samples for comparisons. Finally, prepare gels carefully. Improper gel concentrations can lead to unexpected results, impacting your analysis.

Types of DNA Ladders: Comparing Molecular Weight Markers

When conducting gel electrophoresis, DNA ladders serve as essential molecular weight markers. These markers enable researchers to estimate the size of DNA fragments accurately. Several types of DNA ladders exist, each catering to different experimental needs.

Standard ladders usually consist of DNA fragments of known sizes. They typically range from 100 base pairs (bp) to several kilobases. This variety allows for fine-tuning of analysis depending on fragment lengths. For instance, some ladders are optimized for short fragments, while others are best suited for longer ones. It's crucial to choose a ladder that aligns with the specific application.

Selecting the right DNA ladder can be tricky. Some researchers might overlook the importance of resolution. Using a ladder that does not match the expected size range could lead to confusing results. Additionally, inter-ladder comparisons may require careful consideration. The loading volume can also affect band clarity. It's not uncommon to face issues with visibility, especially in crowded gels. Taking time to reflect on these factors can enhance the accuracy of electrophoresis experiments.

Preparation of DNA Ladders: Necessary Steps Before Gel Electrophoresis

Preparing DNA ladders is crucial for gel electrophoresis. It serves as a size marker for comparing DNA fragments. Start by selecting the appropriate ladder for your experiment. Each ladder has defined fragment sizes. Knowing the sizes helps in accurate comparison.

Careful preparation is key. Mix the DNA ladder with a loading buffer. The buffer contains dyes for easier visualization. Pipette the mixture gently to avoid bubbles. Bubbles can distort results and slow down the process. Ensuring a uniform mixture creates clearer bands during electrophoresis.

Temperature can affect your preparation. Keep the ladder on ice until use. This prevents degradation. If possible, double-check concentrations. Miscalculations can lead to unreliable results. Reflect on your steps. Mistakes happen, but they can offer lessons for future experiments.

How to Use DNA Ladders for Gel Electrophoresis? - Preparation of DNA Ladders: Necessary Steps Before Gel Electrophoresis

Step Description Material Needed Notes
1 Prepare a DNA Ladder solution by mixing pre-determined DNA fragments. DNA ladder, buffer, microcentrifuge tubes. Ensure fragments are accurately measured by using a spectrophotometer.
2 Dilute the DNA ladder to the desired concentration. Dilution buffer, pipettes. Concentration should match the samples for optimal results.
3 Mix DNA ladder gently to ensure homogeneity. Pipette or vortex mixer. Avoid introducing bubbles in the solution.
4 Load the DNA ladder into the gel wells. Gel electrophoresis setup. Use a multichannel pipette for efficiency if available.
5 Run the gel at the appropriate voltage until bands are adequately separated. Power supply, gel tank, and monitoring equipment. Monitor the progress to prevent overheating.

Loading DNA Ladders: Techniques for Accurate Bands Formation

How to Use DNA Ladders for Gel Electrophoresis?

When loading DNA ladders for gel electrophoresis, precision is key. Firstly, use a pipette with a fine tip for accurate loading. Fill the tip carefully to avoid bubbles. Too much liquid can cause bands to smear. Alternatively, insufficient volume might lead to faint bands. Each band should be distinct for accurate comparison.

Consider the buffer composition as well. An appropriate concentration is essential for optimal performance. Adjusting the glycerol in the loading dye can improve band resolution. Remember to position the ladder at the edge of the well. This placement helps minimize distortion. If the ladder overlaps with the sample wells, it can produce confusion in results.

Not every attempt will yield perfect bands. Overloading one lane could obscure nearby bands. It’s crucial to review each gel after running. Uneven bands might indicate loading inconsistencies. A good practice involves repeating the process with slight adjustments. With persistence, you can enhance your electrophoresis results consistently. Engaging in reflective practices will also sharpen your technique over time.

Interpreting Results: Analyzing Bands from DNA Ladders in Gel Electrophoresis

Interpreting results from gel electrophoresis can be both exciting and challenging. After running your gel, the DNA bands generated by the ladder can provide important insights. Each band represents a specific size of DNA fragment. By comparing these bands with your samples, you can estimate the sizes of unknown DNA pieces.

To analyze the bands effectively, it’s crucial to visualize the gel under UV light. The brighter bands usually indicate higher concentrations of DNA. However, some bands may appear faint or smeared. This can suggest issues during sample loading or the gel running process. If bands are too close together, it may complicate size estimation.

When documenting your results, take clear photographs. Keep track of any inconsistencies in band appearance. It's vital to reflect on potential errors in technique. Maybe the gel concentration or voltage was not optimal. Reevaluating these factors can lead to improved outcomes in future experiments. Learning from each run can help refine your methods and enhance your skills in gel electrophoresis.